Anesthesia Information
System (AIS)
In the Operating Theatre
Version 3.X.0
VU
medical centre, Amsterdam
1. Purpose
The management processing and recording of anesthesia information during operation
2. Persons
responsible for the use of the AIS
Anesthesia nurses, anesthesiologist under training, interns and consultants
3. Attention should be
focused on following points:
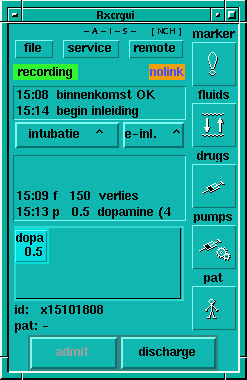
3.1 “No link”
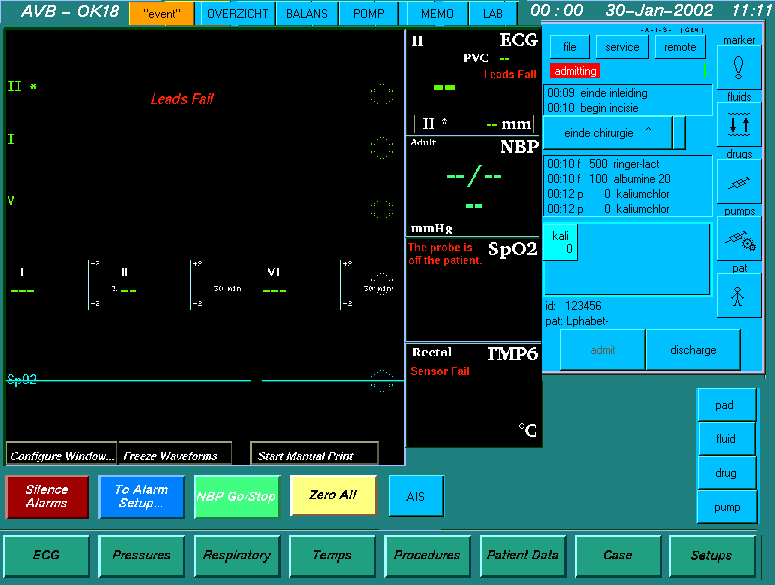
The consequence of the condition “no link” (figure 2)is failure to collect data on server and inability of the system to print an anesthesia record after discharging the patient. If you cannot resolve the “no link” condition by following the recommendations of paragraph 3.1.1 after admission of the patient a classical paper record should be kept!!.
If the “no link” message is followed by “paused” the system has a temporary disconnection from the server. This is does not call for action. The patient can be admitted and connection to the server will be established later.
When “no link” together with “paused” appears on the AIS-pad preoperatively a paper record should be kept, the data already collected can be copied from the screen “overview” from the menu bar.
An extra warning will appear “WARNING NO RECORDER” when the recorder is not connected in the admission screen (figure1)
3.2 “Event”
The orange button [event] will record a time mark and an exclamation mark on the final record print for any event to facilitate a quick retrieval later of a specific moment.
The “marker” menu can record any free text for definition of the event if enough time is available.
3.3 Profile
By pressing the button [file] top left in the main screen a “profile” for the given specialism can be selected under “select profile”
In the admission screen the appropriate profile can be selected by clicking in the field “profile”.
This will make the “top ten” drugs and fluids for this specialism available in the appropriate shortcuts. They are highlighted in orange and visible by pressing the button [pad] on the right bottom menu.
All other medication and fluids are still available in the main lists. Standard drug dosage or fluid amounts for adults are given by default, but can be modified.
By activating the pediatric profile all default amounts are canceled and can be stated individually.
The drug and fluid lists state the standard concentrations provided by our Pharmacy.
3.4 Help
An explanation of available functions can be obtained by putting the cursor on the desired field and pressing F1
4. Using the AIS system
4.1 Preoperatively
4.1.1 Solar system start
|
Push the [power] button on the touch screen Check correct functioning |
|
|
|
Figure 1. example : AIS pad integrated in Solar screen, patient already admitted, no vital signs connected |
4.1.2 Admitting
the patient
|
Activate
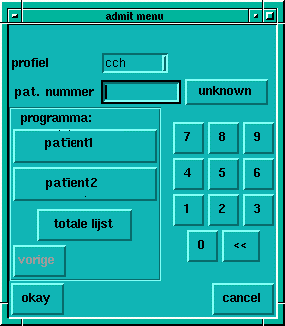
[admit] button on the AIS pad v Method 1: Activate the button with the name of the desired patient on the program. In the demo two testpatients are available The button “total list” gives entry to the full program of the day by roomnumber and patient name in case theatre switches are necessary Press [okay] v Method 2: Type the patient ID number in the designated field Check patient data retrieved from the hospital database Correct input if necessary Press [okay] v If patient ID is not known Press [unknown] The patient will get a provisional ID: x-day-month-time This ID can be changed intraoperatively: press [pat]: choose the button [edit-ID] |
|
|
|
Figure 1b. Admission menu |
4.2
During anesthesia
|
4.2.1 Marker standard events are recorded when activating the button [marker] v now: the actual time is entered.
v T-ind: the time of induction is entered automaticly, with the other buttons the time can be adjusted. v Event: standard procedural times are available and the next sequential option will be displayed as a button. |
|
|
|
Figure 2. AIS pad during anesthesia |
4.2.3 Entering Fluids
|
Press [fluids] Adjust the time as required Activate the field Choose the desired fluid, either by entering first letter(s), or by scrolling through the list Adjust the amount by input in the field “hoev.”,or turning the knob The correct dimension will appear in the field “dim” but can be edited at will Press [store&dismiss]
Basic fluid needs and evaporation are entered as “verlies”=fluidloss ! |
|
|
|
|
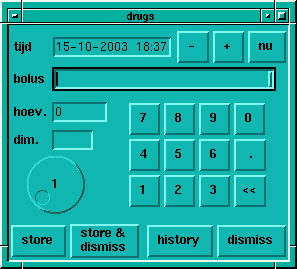
4.2.3 Entering Drugs
|
-Press[drugs] -Adjust the indicated time -Activate the field “bolus” (figure 3) -Choose the desired drug by entering the first letter(s), or by scrolling through the list - Adjust the amount by input in the field “hoev.”,or turning the knob -The correct dimension will appear in the field “dim” but can be edited at will -Press [store&dismiss] |
|
|
|
Figure 3, Menu administered drugs |
4.2.4 Entering Infusion Pumps
|
-Press[pumps] -Adjust the indicated time -Activate the field “pump” (figure 4) -Choose the desired drug by entering the first letter(s), or by scrolling through the list - Adjust the amount by input in the field “hoev.”,or turning the knob -The correct dimension will appear in the field “dim” but can be edited at will -Press [store&dismiss] -In the main AIS pad an icon will appear with an abbreviation of the drug name and the actual pumpspeed. -When the icon is clicked adjustments can be made |
Figure 4, Quick menu pumps |

4.2.5 Patient
Data Form
|
-Press [pat], (figure 5) -The patient data: body height and weight etc, are taken from the preassessment form, they can be edited. -activate the required field -Fill out the field or choose an option from the pop-up menu -Activate the field “intubation” -Type the intubation particulars or choose the quick menu “normal” |
|
|
|
Figure 5, Menu Patient Information |

4.2.6 Procedure
|
-Activate [proc], (figure 6) -Activate [E] voor “elective” of [S] voor “urgent” -state
ASA classification by mouse, touchscreen or [TAB]>[SPACE] -Activate ”inf” for infusion site and choose from the pop-up menu -Do the same for arterial, central venous or Swan Ganz catheter. -When he field “intervention” is not automatically copied from the theatre program database, please enter the procedure manually. |
Figure 6, procedure |

4.2.7 Technique
|
-Activate the button {TECH], ( figure7) -Select the appropriate pop-up menu in all the respective fields, free input is always possible. -Choose tube, type and size. -Activate
the desired squares by clicking, touching or [TAB]>[SPACE] -[previous] will copy the entries from the
previous operation. This feature is helpful when
many similar operations are on the program. Mutations are always possible. |
Figure 7, technique |

4.2.8 Memo
-This button opens a free input screen where particulars of the operation and postoperative care recommendations are put down.
4.2.9 Team
|
The members of the operation team for elective procedures
are automatically entered from the operation program. For emergency surgery
they have to be entered manually. |
|
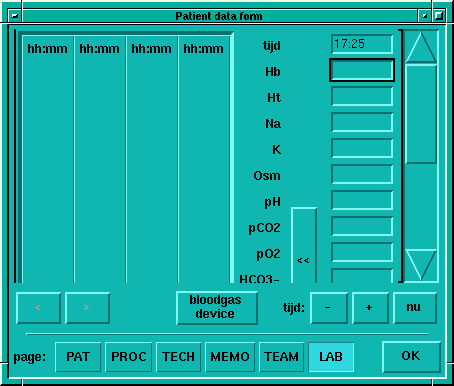
4.2.10
Laboratory results
|
Activate button [LAB] (figure 8) The results of our bloodgas analyzer can be retrieved online and entered in the record. -Press button [bloodgas device] -A pop-up lists the last 20 results available in the analyser -Select your patient or theatre number -When correct patient results and time are on the display press [accept] -The results are entered in a table and printed in the record. -The results of an off-line analyser can also be entered manually in the right hand side column. When completed enter with button [<<] -If a mistake is made the column in the left hand table can be taken back to the right by clicking on it. After correction click [<<] |
Figure 8, laboratory |
4.3 Terminating a Recording
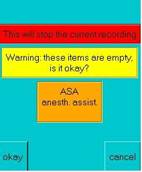
4.3.1 End of Surgery
|
-Activate [discharge], (figure 2) -If important data are not entered a warning screen will show wich data are missing in the orange field e.g.: ASA class and a team member (figure 9) -Upon completion press [okay] -All data of the operation together with biometric monitoring data and ventilator data will be saved in a record on the server and a report generated. The report will be printed in A3 format in the recovery room. |
Figure 9 discharge warning |
5
General Remarks
5.4.1 Toolbar

· [event] enters a marker “event”
· [overzicht] opens the global history of all entries
· [balans] displays the fluid input/output balance
· [pomp] displays the listing of drug infusion pumps settings and chronological changes
· [memo] is a shortcut to the memo page (paragraph 3.2.8)
· [lab] is a shortcut to the bloodgas analyser page (paragraph 3.2.10)
5.4.2 Shortcuts
For a fast entering of drugs or fluids shortly after administration a toolbar with the respective shortcuts is available at the bottom right screen
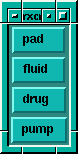
[pad] is a shortcut to the “topten” of drugs and fluids of the selected profile
[fluid] is a shortcut to the fluids menu
[drug] is a shortcut to the drugs menu
[pump] is a shortcut to the drug infusion pumps menu
Appendix 1 Names and Abbreviations
|
Where? |
Abbreviation |
Name |
|
Where? |
Abbreviation |
Name |
|
|||
|
Algemeen |
gen |
Generic |
|
tube |
ora |
Oral |
|
|||
|
|
pat |
Patient Data |
|
|
nas |
Nasal |
|
|||
|
|
e-inl |
End of Induction |
|
|
trac |
Tracheal |
|
|||
|
|
hoev. |
Quantity |
|
soort |
dublu |
Double Lumen |
|
|||
|
|
dim. |
Dimension |
|
|
enklu |
Single Lumen |
|
|||
|
|
edit id. |
Edit Patient ID |
|
|
gewap |
Spiral/ Armed Tube |
|
|||
|
|
proc |
Procedure |
|
|
injec |
- |
|
|||
|
|
tech |
Used Techniques |
|
|
jetve |
Jet Ventilator |
|
|||
|
|
lab |
Laboratory |
|
|
laryn |
Laryngeal Mask |
|
|||
|
|
BHN/BHN2 |
Input Cardiosurgery Reg |
|
|
trach |
Tracheal |
|
|||
|
|
ucath |
Urine catheter |
|
ligging |
cere |
Cerebellum |
|
|||
|
|
hypother |
Induced Hypothermia |
|
|
half |
Semi Sitting |
|
|||
|
|
hypoten |
Controled Hypotension |
|
|
sala |
Salaam |
|
|||
|
|
ECC |
Extra Corporeal Circulation |
|
|
stee |
Gynaecological Position |
|
|||
|
|
IABP |
Intra-aortal Balloon pump |
|
|
zijl |
Left Side Position |
|
|||
|
|
|
|
|
|
zijr |
Right Side Position |
|
|||
|
|
|
|
|
|
|
|||||
|
Where? |
Abbreviation |
Name |
|
|||||||
|
Urgentie |
e |
Elective |
|
|||||||
|
|
s |
Urgent |
|
|||||||
|
Algeheel |
gem |
Combined |
|
|||||||
|
|
inh |
Inhalation |
|
|||||||
|
|
ven |
Venous |
|
|||||||
|
Epiduraal |
cau |
Caudal |
|
|||||||
|
|
cer |
Cervical |
|
|||||||
|
|
lum |
Lumbar |
|
|||||||
|
|
tho |
Thoracic |
|
|||||||
|
Locoregionaal |
and |
Other |
|
|||||||
|
|
axi |
Axillary |
|
|||||||
|
|
bie |
Biers |
|
|||||||
|
|
cor |
Coracoid |
|
|||||||
|
|
dri |
Three In One |
|
|||||||
|
|
fem |
Femoral |
|
|||||||
|
|
ing |
Inguinal |
|
|||||||
|
|
inp |
- |
|
|||||||
|
|
ins |
Interscalenar |
|
|||||||
|
|
isc |
Schiatic |
|
|||||||
|
|
per |
Peroneal |
|
|||||||
|
|
pso |
Psoascompartment |
|
|||||||
|
|
spi |
Spinal |
|
|||||||
|
|
sup |
Supraclavicular |
|
|||||||